
Dragonfly Dream Catcher - DIY Diamond Painting
$31.99
$71.08
SAVE $39.09
Catchy Dreamcatcher - DIY Diamond Painting
$20.99
$46.64
SAVE $25.65
Wolf Dream Catcher - DIY Diamond Painting
$31.99
$71.08
SAVE $39.09
Cartoonish Dreamcatcher - DIY Diamond Painting
$20.99
$46.64
SAVE $25.65
Shining Dreamcatcher - DIY Diamond Painting
$30.99
$68.86
SAVE $37.87
Dreamer Dreamcatcher - DIY Diamond Painting
$49.99
$111.08
SAVE $61.09
Feathered Dreamcatcher - DIY Diamond Painting
$31.99
$71.08
SAVE $39.09
Baby Blue Dreamcatcher - DIY Diamond Painting
$39.99
$88.86
SAVE $48.87
Vibrant Dreamcatcher - DIY Diamond Painting
$31.99
$71.08
SAVE $39.09
Candy Dreamcatcher - DIY Diamond Painting
$30.99
$68.86
SAVE $37.87
Colored Smoked Dreamcatcher - DIY Diamond Painting
$20.99
$46.64
SAVE $25.65
Dreamcatcher - DIY Diamond Painting
$30.99
$68.86
SAVE $37.87
Soft Colored Dreamcatcher - DIY Diamond Painting
$20.99
$46.64
SAVE $25.65
Floral Dreamcatcher - DIY Diamond Painting
$20.99
$46.64
SAVE $25.65
Pastel Dreamcatcher - DIY Diamond Painting
$30.99
$68.86
SAVE $37.87
Matte Dreamcatcher - DIY Diamond Painting
$30.99
$68.86
SAVE $37.87
Girly Dreamcatcher - DIY Diamond Painting
$30.99
$68.86
SAVE $37.87
Dreamcatcher Smokey - DIY Diamond Painting
$20.99
$46.64
SAVE $25.65
Smokey Dreamcatcher - DIY Diamond Painting
$30.99
$68.86
SAVE $37.87
Find everything you need to enjoy your diamond paintings right here at Colorelaxation. Explore different styles of diamond painting designs from animals and wildlife to portraits and stylized designs. You can even create your own custom design for a personal touch. Colorelaxation has got you covered with anything and everything to make your diamond paintings come together. Our kits are a convenient option to get you started, while our accessories and tools make your projects even easier to complete. You can trust Colorelaxation to provide you with a wide range of high-quality diamond art painting supplies.
Have you just heard the term diamond painting and it has already started to tempt you? Well, this happens to all the artists out there.
Since you’re new to diamond art, this amazing beginner’s guide will take you the diamond painting tour step by step. Hint: It's easier than Cross Stitch!
Let’s start.
What Is Diamond Painting?
Diamond Painting is an interesting new art, or you can say a hobby which is the combination of cross stitch and paint by numbers. It is an easier and faster alternative to the Cross Stitch. It is a therapeutic and enjoyable craft for wannabe artists no matter young or old. In diamond art, you stick tiny diamonds, also referred to as crystals, beads, and rhinestones, in a predefined pattern on an adhesive DMC-coded canvas to form a shiny and vibrant crystal painting. The whole process of sticking diamonds according to instructions is quite meditative and thrilling, very similar to cross-stitch.
What makes diamond painting a super fun activity is a fact that it is very easy to learn for all age groups.
A Diamond Painting Kit
A diamond art kit is the first thing you require to start painting with diamonds. It is basically an all-inclusive kit that has everything you may require to create a diamond painting. Different diamond art companies offer different kinds of kits with varying prices.
However, here are few things that a basic diamond package includes:
- The actual design printed on paper or fabric (For an idea of what your finished diamond art should look like)
- Colorful diamonds or beads
- The applicator tool
- Adhesive canvas
- Wax pad
Once you have all these things on the table, you are ready to start.
Types of Diamond Painting Kits
There are three major types:
- Partial Drill Kit
- Full Drill Kit
- Multi-panel Canvas
Partial Drill Kit
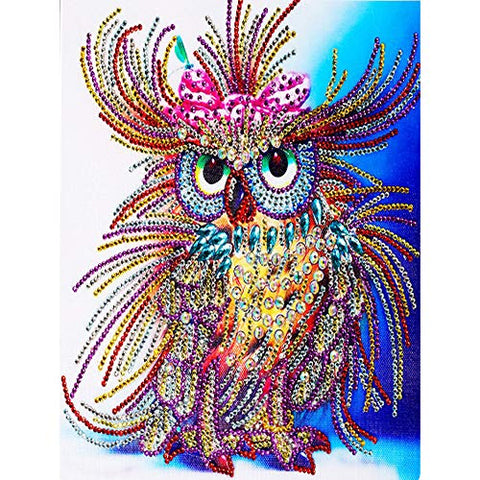
In a partial drill kit, diamonds only cover a certain portion of the kit. There is a painting area made with painting colors and a certain area is left for the diamonds to stick on.
Full Drill Kit
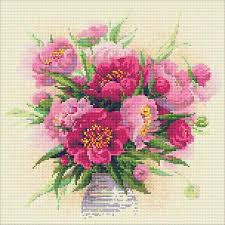
In full drill kit, the entire painting space on the canvas is covered with the diamonds. This requires the complete painting to be painted by the diamonds.
Multi-Panel Canvas
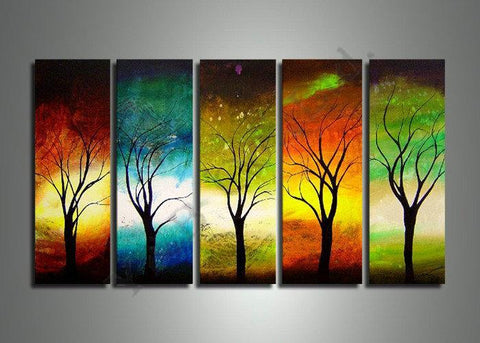
It can be partial or full-drill diamond painting package that contains one or two paintings to complete the final piece.
Things To Know Before Buying A Diamond Art Set
Before you order your first diamond painting kit, just make sure you pay attention to the things mentioned below:
- What’s in your package
- Where your kit is coming from
- How it is packaged
It is important to know that your diamond painting package has all the supplies you might need. Also, if your diamond art set is coming from overseas, you wanna make sure it is packed properly so that it doesn’t get damaged in transit.
Ordering from Colorelaxation will put you at ease because we make sure that the diamond painting kits are properly packaged and can be shipped overseas without getting anything damaged in the process.
Also Read: Top 5 Things To Know Before You Buy Diamond Art Kits
What is Diamond Painting? Diamond Painting Instructions
Seems pretty amazing so far, right? No matter how easy the diamond painting is, beginners might still mess it up if they don’t have basic instructions in mind.
It's a cross between Paint by Numbers & Cross Stitch.
Therefore, if you are trying diamond painting for the first time, here are some steps that are going to help you run things smoothly with your very first masterpiece:
- Unpack your diamond art package and remove all the items one by one.
- Put your canvas on a completely flat surface.
- Sort all your diamonds in different storage boxes according to the colors
- Place the diamonds in a grooved tray or easy picking of diamonds.
- Start with the single color first and fill all relevant boxes with the help of diamond applicator tool. Use the wax pad to help your diamond stick better to the applicator tool. You can also use tweezers to pick up the diamonds.
- Repeat step 5 until you have completed your diamond painting.
What if my canvas has creases?
When the diamond painting packages are shipped from overseas, it might get little creases. But don’t worry, there are some ways you can get rid of the creases without doing much. There are three simple approaches to remove the creases from the canvas:
Method 1: Keep the creases canvas under your mattress overnight and the creases will wear off in the morning. If the creases don’t go away in one night, leave the canvas under your mattress for 2-3 more nights.
Method 2: Put heavy books on your canvas and leave them for a day or two.
Method 3: If your canvas has stubborn creases, you can simply cut the creases out with a crafting knife. Take the knife and simply go over the creases lightly and make sure to release any air trapped between the canvas and its adhesive layer.
Like flower diamond art? Click here.
Diamonds Shapes

The diamonds for the diamond painting come in two shapes:
- Round Diamonds
- Square Diamonds
The diamond art set that comes with the square diamonds s called “Square Drill” and the one that comes with round diamonds is referred to as “Round Drill”. Diamond Painting is a new craft hobby that's a mix between cross stitch and Paint By Numbers.
Round Drill VS Square Drill – Which One Should You Choose?
Well, there is no right question to this answer because it’s all relative and depends on individual perspective and preferences. One should always go with the shape they find more appealing and beautiful.
However, we are going to discuss few things about square and round diamonds which may help you make a better choice for yourself.
Square Drill Diamond Painting
A square drill diamond painting is more visually appealing because it creates a fuller and cleaner look by using up the entire area of the canvas while leaving no empty space in between the consecutive diamonds. It looks attractive even from the small distance and gives a more satisfying design.
At the same time, it can be more time consuming and hectic especially for the beginners. You have to be very careful while sticking the diamonds because they should stick right in the place and in a straight line. A single misplacement might ruin your entire painting.
Round Drill Diamond Painting
Round drill is very much easier and faster than the square drill. Round diamonds stick more easily to the applicator tool and one finds it seamless to stick round diamonds to the canvas. You will be able to finish round drill painting in much less time as compared to round drill.
However the finished painting might seem a little less satisfying and a bit incomplete because of the gaps between diamonds.
The painting may look great from a distance but you will definitely notice the gaps while tagging a closer look.
For in-depth guide on Round VS Square Diamonds, Click Here.
Different Diamond Painting Techniques for Beginners
When you have created 4-5 diamond paintings and stick thousands of diamonds, you may get a little bored. Don’t worry; there are ways to spice things up in diamond painting. There are plenty of diamond painting techniques for you to try and the strategies to follow.
Let’s get through these one by one.
The Checkerboard Technique
You all must know how a checkerboard looks like. Now, imagine your canvas like that with alternating black and white squares on the bigger areas with a large amount of the same color. Now, you fill the gaps and enjoy how satisfying the entire checkerboard technique is. You will feel amazing when everything snaps right into the place just so perfectly.
The Dealer Technique
If you are one of the most obsessive artists and need your diamonds lined up perfectly, this technique is meant just for you. This technique works with the help of a credit card. Just take an old credit card and run it through the slots between the drilled lines so that they get pushed into a straight line.
Work Your Way Up Technique
How about leaving your best for the last? There are two perks to this – you don’t get tired of sticking the diamonds to the same old canvas and you stay involved till the end, just because you haven’t touched the interesting part yet. So, “Work Your Way Up” technique really works to keep you involved in the painting till the end. You start with the smallest quantity color and finish with the largest quantity color. It makes things easier step by step because you can fill the larger chucks with the multi-applicator tool.
One at a Time Technique
This diamond painting technique is the easiest. You just have to work your way across the canvas by working on just one color at a time. It gives you a break from row by row sticking of diamonds and you have to trust us when we say that half-filled canvas with the same color looks so much satisfying. Though, there is one drawback to this technique is that the exposed area may lose their glue.
Tip: If you find that your canvas is losing its glue, you can dab the spot with a baby wipe or a moist towel.
Farm Plot Technique
Now consider that you are a farmer and the canvas is your field. Now what you have to do is divide your field into the smaller plots (preferably rectangular) making sure that your plots are wide enough to let you 3-5 diamonds at a time.
No matter what technique you use, we are sure you’ll end up with a nice masterpiece. But what to do when your diamond painting is complete? Well, you can frame it to keep it in place for a long time.
Love painting animals? Check our animal diamond painting collection here.
How to Frame a Diamond Painting?
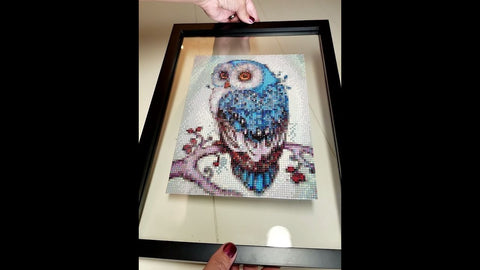
After a while, your diamond painting might start to pile up. Well there is something you can do to prevent it and framing your painting is the best way to do it. Colorelaxation’s premium wooden frame can help you frame your painting and keep it intact for longer periods of time. It will also make your diamond painting look much better than before.
Check our guide on how to frame a diamond painting here.
Be sure to follow all the instructions step by step so that you don’t mess this thing up.
Tips & Tricks For Diamond Painting
Once you’ve started to paint with diamonds, you’ll eventually discover your own tips and tricks to make it faster and more efficient. You kinda start to become a pro with time. The practice makes the diamond painting process even better, faster, and cleaner. Since we’ve been in the industry for years, here are a few tips that we discovered:
- When your diamond package arrives, you’ll see that the canvas has been covered with a plastic film to protect the sticky adhesive. When you start with the design, do not expose the entire canvas. Instead, peel back the film slowly as you work your way up the design.
- Don’t have storage boxes? It’s perfectly fine. You can use egg cartons or medicine box for storing your diamonds. You should also read our Diamond Storage Hacks for more ideas.
- For an easy reference, you can tape the diamonds next to their symbol so that you don’t always have to check the symbol while painting. You can just look at the taped diamond and pick your diamonds easy and fast.
- You can use the LED light pad to get appropriate lighting on your canvas. This brings you better visibility.
- If your canvas has started to lose the glue, you can retain it by dabbing a wet towel on the affected area.
- Use 3D magnifier for the smaller areas to get a cleaner painting.
- Once you have finished your diamond painting, keep it under your mattress overnight to make sure the diamonds stick properly to the canvas and stay in place for a long time.
Conclusion
Congratulations, you are now a part of a very creative Diamond Painting Family. You are going to me the master of a lot of masterpieces. This is a new hobby that is simpler than cross stitch and yet gives the same pleasure.
Now that you are embarking on a brand new and relaxing hobby, we wish you all the best.
Checkout more about what is diamond painting at and exciting Diamond Art Kits at https://colorelaxation.com/.
 |
Checkout our all time bestsellers in our handpicked collections for you |
 |
Checkout our Huge Animal collection, more than 600 different kits of owls, birds, horses, dogs, cats, wolves, turtles etc |
 |
3 Must have Diamond Painting Supplies for creating a masterpiece |
 |
Top 5 Things to know before you buy diamond art kits |

